Recently, I attended a wedding shower for the lovely lady who is marrying one of Mr. G's brothers. I love the girl and it's awesome that Mr. G's family keeps growing and giving me more people to enjoy!
My MIL and SIL were one of the shower hosts, and when they mentioned they were in charge of centerpieces as well as some other things, I quickly volunteered to take over the centerpieces. It worked out great because 1) I live for craft projects and 2) it gave my SIL more time to concentrate and the oodles of delicious cupcakes she was baking for the shower.
There were no colors picked for the shower, but it was loosely Disney themed (because the two got engaged at Disney World), so I picked up that theme and ran with it.
I was up for anything, but my mail goal was something I could make/make pieces of before hand because I would need 10 of these to travel up to my in-laws with me, and then on to the shower from there.
I was inspired by this image from etsy. It's clearly for a birthday, but it gave me a good jumping off point. (All of the following are personal photos unless otherwise noted.)
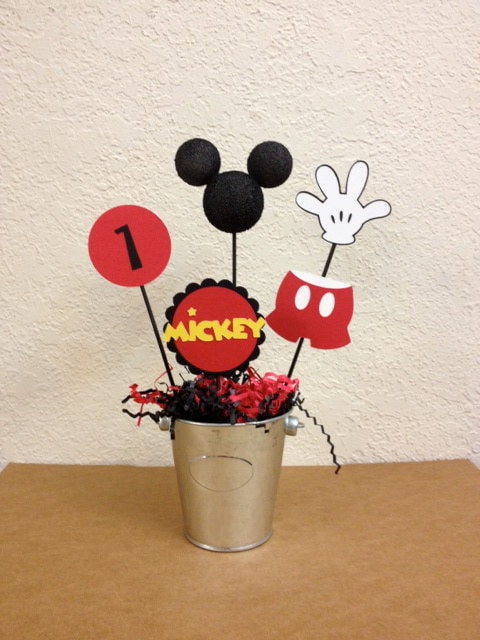
Mickey Mouse Birthday Centerpieces / Created by TheGirlNXTDoor on etsy / etsy.com
After that, I turned to Adobe Illustrator to create the pieces I knew I'd need. I knew I wanted a Mickey head with the happy couple's name cut out of it. I planned to cut it out using the SCAL software and my Cricut. Unfortunately, I have a smaller Cricut that can only cut up to the size 6"x12", but I remedied that by cutting the Mickey ears out separately from the rest of the head.

I then designed a bow as well, so I could have Mickey on one side and Minnie on the other. I cut solid color paper to go behind the cut outs so it could be double sided.
After cutting it out, I embossed the head and bow pieced in my Cuttlebug to give them some texture.
I stopped by Target to pick up a backet from the $1 spot and some flowers so I could send a photo of my mock up to my MIL and SIL.