So, I realize the last post I wrote about Save the Dates was in January, but, as I started to move on to sharing my invitations with you guys I felt like the right thing to do would be finish off my STDs. I'm just going with a "better late than never" attitude on this one, and besides, it is on my list of things to blog about before we get our pro pics, so I'm finally getting back to it.
I never shared the assembly or budget, though, and I've always wanted to let you know how we put them together because it was so easy and simple; so, finally, our STD assembly!
To refresh your memories, here are our STDs (the bottom two photos are digital mock ups).
Okay, so basically, we had a post card and a business card sized magnet. We stuck the magnet to the card, put them in an envelope and sent them on their way.
It all started with trying to figure out how to put our magnet on our postcard, which led to me looking up how Bees before me did it.
I think I've should've pulled a Sewing here. That genius thought to mention "MAGNET!" right on her postcard. At the time, I hoped our guests figure it out . . . because I know Grandma G didn't when I showed it to her. Oh well! I think the difference between the matte postcard & glossy magnet were difference enough.
Yes, that's right: Glue dots.
Mr. G and I had been looking at sticky squares, and decided to use adhesive photo corners (even though I think they're a pain) because it seemed like it might work better than our original plan on tape. This was when we were in the scrapbook aisle. We had to make it to the other end of the store to get something else, and we happened to see Glue Dots in another aisle.
And, let me tell you, they're wonderful. They're cheap and they come in a pack of 200 (which was way more than we needed). They also come in a mini size if you need it, and, most importantly, the ones in the green box are removable (which is important because our guests had to be able to remove their magnet).
Oh and did I forget to mention that they're in a dispenser? So the Glue dot literally just rolls on, and you don't even have to worry about peeling and sticking it yourself? Yeah, they were made for this project I think.
After having the magnets and postcard printed through Vistaprint, we got to work.
I started with lining the envelopes. All I did was make a template our of paperboard, trace it onto wrapping paper, cut, and repeat.
 Then, I tucked a cut out liner into an envelope, and because I'm lazy, only glued the top half down. As long as no one used a letter opener, the bottom half of the liner wouldn't fall out. . . And if then did, I'm over it :-D.
 Then Mr. G stuck on a Glue Dot, and stuck a magnet to it while I stamped the fronts and back of our envelopes (or, if I wasn't paying attention, stamped the fronts of our envelopes twice, which only happened twice, thank you very much).
 I realize I cut off Mr. G's head in this photo, but I wanted you guys to see the Glue Dot dispenser, which is the neon green thing by Mr. G's hand.
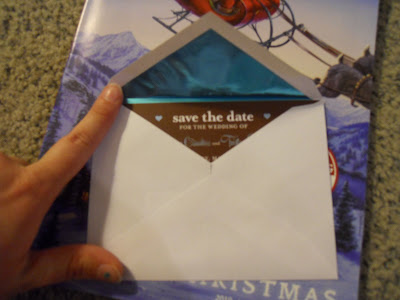
After that, we simple stuck our postcards into their envelopes, and they were ready to be sent on!

 I still love how these turned out, many months later, especially. because of what the guests saw as soon as they (painstakingly carefully) opend the envelope.
 And that's it! I hope the world's easiest assembly was worth the wait :). Tune in for the budget breakdown.
Did you DIY your STDs? How did your assembling go?
0 comments:
Post a Comment