We've all ready learned about dotted lines, glyphs, zig zag lines, and black & white effects, so I bet you're wondering what could possibly come next. Today we're going to use clipping masks to make a thank you card.
I know, I know, what a strangely specific thing to write about, right? But when I read Starfish's post about thank you cards, I started wondering how else you could incorporate wedding photos into thank you cards - aside from the liners she made- besides the standard photo with 'thank you' on top.
This is what I think of when I typically think of a wedding thank you card (Well, at least before I started reading WeddingBee and finding out about all those great idea, anyway!): (source)
 Here's what we're going to make:
Okay, here we go! I took a ton a screen shots, but I promise, this is totally doable for beginners because it's soooo easy!
A quick FYI to avoid confusion: Masks (aside from specific clipping masks) in Photoshop are different than making a clipping mask in Illustrator. This post is just about Illustrator.
Pretend you got married on a beach and want to put that photo on your card, like this photo. You can use any photo though - even one of you making kissy faces your new hubby. This is how you would do it.

For this, I highly recommend using a bold and/or condensed typeface. They'll work the best. Here are some examples (I'm using Poplar).

Step 1) Place your image into Illustrator by going to File > Place and selecting the image you wish to use.

Step 2) Make a new text box and type thank you in the typeface you wish. I made the "you" a little extra big because I'm cool like that.

Step 3) Click on your "Thank You" to select it and place it on top of your image.
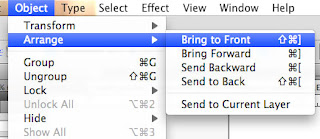
Note: in order for this to work, the words have to be on the top. If they're not, bring it to the front by going to Object > Arrange > Bring to Front.
Here's the thank you on top of the image:

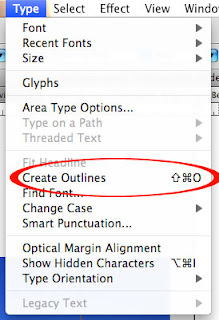
Step 4) Click on your "thank you" to select it and choose Type> Create Outlines.
Step 5) Select your "Thank You" and choose Object > Compound Path > Make.

After you chose "Compound Path" this is what your "thank you" will look like:

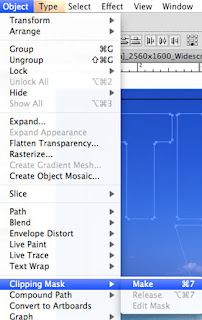
Step 6) Here's where the magic happens! Select both the image and the "thank you" and click Object > Clipping Mask > Make.
It's that simple! There you have it!
Good work, team!
Anybody else making clipping masks? Better yet, any ideas for future posts (aside from scalloped edges - they are on the way soon!)?


0 comments:
Post a Comment